How to Create a Free AI Chatbot Trained with your Business Document only with Google Drive: The Simplest Solution Ever – Part I.
Ever been amazed by AI chatbots and wished you could create one trained to answer questions regarding to your business data? It’s entirely possible, but the most common solution often involves complex and intimidating cloud architectures. In this tutorial, we’ll bypass that complexity entirely. I will show you how to build a powerful, FREE, custom-trained AI chatbot using only Google Drive.
- How Do Custom AI Chatbots Actually Work?
- Our Solution: A Powerful Free Chatbot Built Entirely on Google Drive
- Try It Out For Yourself
- The Soul of the Chatbot: The System Prompt
- Step-by-Step Guide: Building Your Chatbot in 5 mins
- Conclusion: A Powerful Tool with Clear Trade-offs
- How to Add It to Your Website
How Do Custom AI Chatbots Actually Work?
To understand our approach, it’s important to first grasp how large language models (LLMs) like ChatGPT and Gemini work. These models are trained on a massive, but fixed, dataset. Their knowledge is essentially frozen in time at the point their training was completed. You can’t truly “retrain” or “extend” this core model with your own private business documents.
So, how can a chatbot answer questions about information it was never trained on?
This is where Retrieval-Augmented Generation (RAG) comes in. It’s a clever process that gives the LLM the context it needs, right when it needs it. Here’s how it works in a nutshell:
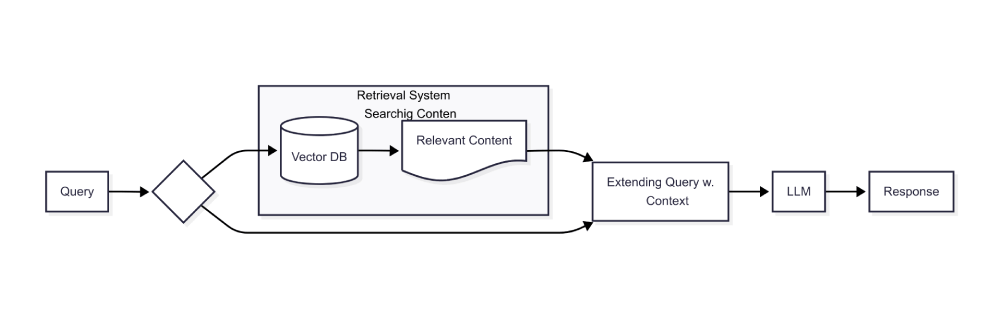
- A question is asked: A user asks your chatbot something specific about your business.
- A search on your documents is performed: Instead of immediately asking the LLM, the system first searches through your private documents (your knowledge base) to find text snippets that are relevant to the user’s question.
- Context is provided: This relevant information is then bundled together with the original question and sent to the LLM. This makes the LLM capable to provide customized answers, related to your business, to the user’s question.
- A response is returned: The LLM generates a direct answer to the user’s query based on the context it just received and sends it back.
This is exactly what we are going to build, but we’ll be simplifying the “search” part significantly by using Google Apps Script and Google Drive.
Our Solution: A Powerful Free Chatbot Built Entirely on Google Drive
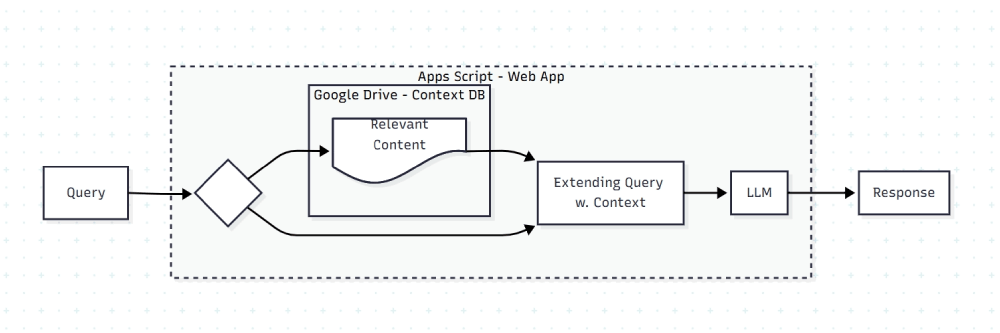
Now that we understand the theory of RAG, let’s talk about how we’ll build our own version using a much simpler toolkit. Instead of a complex cloud environment, our entire chatbot will live within your Google account.
Here’s the plan:
- Knowledge Base:
We’ll use a Google Drive folder to store all the business-related documents you want the chatbot to know about. This is our version of the search database. - Application:
We will create a single Google Apps Script Web App. This script will handle everything—it will be the user-facing chat window (frontend) and the logic that communicates with the AI (backend).
The magic behind this simplified approach lies in five key tricks:
- Providing Full Context, Every Time:
Instead of a sophisticated search, we’re taking a more direct route. We will read the entire content of every document in your Google Drive folder. This complete text, along with your system prompt, is attached to every single message you send to the AI. This ensures the model always has the full context to answer questions based on your documents. - Smart Caching for Speed:
Reading every document on every turn would be slow and inefficient. To solve this, we’ll use the built-in Apps Script Caching Service. When the app first runs, it will export the content from all your documents and store it in a temporary cache. This cache lasts for up to six hours, meaning the content can be instantly retrieved and attached to your prompts without re-reading the files each time, making the conversation fast and smooth. - Leveraging a Massive Context Window:
This entire method is made possible by using Google’s Gemini 2 Flash model. This powerful AI is currently free to use via the AI Studio API and, most importantly, features a massive 1 million token context window. This huge capacity allows us to feed it a large amount of text (the entire content of your documents) in a single API call, something that wasn’t practical with older models. - Preserving Document Structure with Markdown:
Our business information will be stored as Google Documents. When we provide this information to the AI, we won’t just send plain text. We will use a built-in Google Drive feature to export the documents in Markdown format. Because LLMs understand Markdown, we can preserve crucial formatting like headlines, lists, and even tables. This helps the AI better understand the structure and hierarchy of your information, further improving the quality and accuracy of its answers. - Implementing a Simple Human Handoff:
Our solution won’t have a live queue of human operators. But what happens if the chatbot gets stuck or a user specifically asks for a person? We will handle this through smart prompting. We will instruct the agent that if it cannot answer a question, its job is to ask the user for their contact information. Once provided, the script will automatically forward the entire conversation history to a specific Google Workspace Chat, ensuring no query is lost and a real person can follow up.
Try It Out For Yourself
Theory is great, but there’s no better way to understand the final product than to interact with it directly. I have built a demonstration version of this chatbot for you to test.
Note: For security reasons, the preview/demo is only available to visitors logged into a Google account.
Click Here to Try the Live Demo Bot
For the sake of this tutorial, I have trained this bot on publicly available information about the Santander UK Personal Loan product. You can ask it questions about interest rates, loan terms, and eligibility criteria based on that data. It can also perform a basic monthly repayment calculation if you provide a loan amount and a term.
Important Disclaimer: Please be aware that this is a demonstration model only. The training data is not continuously updated and may be out of date. Furthermore, the loan calculation is a simplified estimate, as the exact formula used by Santander is not public knowledge. The results and calculations provided by this demo bot will not match the official figures from the bank.
The Soul of the Chatbot: The System Prompt
The real magic that brings our chatbot to life isn’t just the code, but the detailed instructions we give to the AI model. This is called the “system prompt,” and it acts as the chatbot’s core personality, rulebook, and job description all in one. Every single conversation starts with this hidden set of commands.
In essence, we command the AI to become a helpful customer support expert for a specific brand. Its knowledge is strictly limited to the content we dynamically inject from your Google Drive documents, and it’s forbidden from revealing this source, making it sound like a true authority. The prompt gives it a clear list of tasks: stay on topic, answer questions from the provided context, and perform loan calculations using a specific mathematical formula always clarifying that results are estimates.
To handle situations where it gets stuck or the user asks for a person, it follows a simple human handoff protocol by asking for contact information.
Step-by-Step Guide: Building Your Chatbot in 5 mins
Ready to build? Follow these steps precisely, and you’ll have your custom AI chatbot running in no time. We’ll set up the document storage, create the app, and deploy it for the world to see.
Step 1: Create Your Knowledge Base in Google Drive
This is where your chatbot will learn.
- Go to your Google Drive.
- Create a new, dedicated folder. Let’s call it My Chatbot Knowledgebase.
- Get the Folder ID: Click on the folder to open it. Look at the URL in your browser’s address bar. The last part of the URL is the Folder ID. Copy this ID—you’ll need it soon. For example, if the URL is
https://drive.google.com/drive/folders/1a2b3c4d5e6f7g8h9i0j, your Folder ID is1a2b3c4d5e6f7g8h9i0j. - Inside this folder, create one or more Google Docs files. Fill these documents with the information you want your chatbot to know about your product or business. Use headings, lists, and tables as you normally would. This is the content that will be fed to the AI.
Step 2: Create the Google Apps Script Project
This will be the engine of our chatbot.
- Go back to your Google Drive.
- Click New > More > Google Apps Script. This will open a new script project in a new tab.
- Give your project a name at the top left, for example, “My AI Chatbot”.
Step 3: Add the Code Files
Your project needs two files: one for the backend logic (Code.gs) and one for the chat interface (index.html).
- You will already have a file named
Code.gs. This is where our backend code will go. - Create the frontend file: Click the + icon next to “Files” in the sidebar and choose HTML. Name the new file exactly index (it will be saved as index.html).
- Copy and Paste the Code: Now, you will simply copy the complete code for Code.gs and index.html from the sections below and paste it into the corresponding empty files in your Apps Script project.
The content of the index.html file
Step 4: Configure Your Script
You need to tell your script where to find your documents and how to access the AI.
- Open your
Code.gsfile. - Find the lines at the top that say
DRIVE_FOLDER_IDandGEMINI_API_KEY. - Replace
DRIVE_FOLDER_IDwith the Google Drive Folder ID you copied in Step 1. - Get your Gemini API Key:
- Go to Google AI Studio at https://aistudio.google.com/
- Click on “Get API key” and then “Create API key in new project”.
- Copy the generated key.
- Go back to Code.gs and replace
GEMINI_API_KEYwith the key you just copied. - Set the Google Chat Webhook URL (for Human Handoff)
Important Note: This feature is only available for Google Workspace accounts (e.g., yourname@yourcompany.com). It is not available for personal Gmail accounts. You must also perform these steps on a computer, not a mobile device.- Open Google Chat in your browser.
- Go to the Space where you want to receive handoff notifications.
- At the top, click the down-arrow arrow next to the space’s name, then select Apps & integrations.
- In the dialog box that appears, click + Add webhooks.
- Give your webhook a name (e.g., “Chatbot Handoffs”) and click Save.
- A new webhook will appear in the list. Click the copy icon to copy the full webhook URL to your clipboard.
- Go back to your
Code.gsfile and replace'YOUR_GOOGLE_CHAT_WEBHOOK_URL_HERE'with the URL you just copied.
Step 5: Finetune Your System Prompt
The provided prompt is a great starting point, but the real power comes from customizing it to your exact needs.
- In your Apps Script project, go to the
Code.gsfile and find thesystemInstructionTextvariable. - Modify it! Change the brand name, adjust the personality or add new rules specific to your business. This is how you make the chatbot truly yours.
Step 6: Deploy the Web App & Grant Permissions
This is the final step to make your chatbot live.
- Click the blue Deploy button in the top-right corner and select New deployment.
- A dialog box will appear. Click the gear icon next to “Select type” and choose Web app.
- Fill in the settings:
- Description: Give it a name, like “My First AI Chatbot”.
- Execute as: Me (you@gmail.com)
- Who has access: Anyone (This makes your chatbot public. Choose “Anyone with a Google Account” if you prefer).
- Click Deploy.
- Authorize Permissions: Google will now ask you to grant permission for the script to run. This is a critical step.
- Click Authorize access.
- Choose your Google account.
- You will see a warning screen saying “Google hasn’t verified this app.” This is normal for personal scripts. Click Advanced, and then click Go to [Your Project Name] (unsafe).
- Finally, review the permissions (it will need to access Google Drive, connect to external services, etc.) and click Allow.
After you deploy, a window will show you the Web app URL. This is the link to your live chatbot! Copy that URL, paste it into a new browser tab, and start chatting with your custom-trained AI assistant.
Conclusion: A Powerful Tool with Clear Trade-offs
We’ve successfully built a custom-trained AI chatbot using nothing but Google Drive and Apps Script. This approach offers a fantastic, accessible entry point into the world of custom AI. Let’s summarize its advantages and limitations compared to a traditional, more complex RAG solution.
Advantages of Our Simple Solution
- Incredible Simplicity: You don’t need to understand vector databases, cloud architecture, or complex data pipelines. If you can use Google Drive, you can build this.
- Extremely Cost-Effective: For small-to-medium use cases, this solution is virtually free. You’re leveraging your existing Google account and the generous free tier of the Gemini API.
- Speed of Development: You can go from idea to a working prototype in an afternoon, not weeks.
- Perfect for SMBs and Internal Tools: This is an ideal solution for small businesses wanting to add a support bot, or for creating an internal tool to help your team query company knowledge bases.
Limitations Compared to a Proper RAG
- Scalability: Our “read everything” approach works brilliantly for a dozen or even a few dozen documents. It does not scale to thousands of documents. A proper RAG system is designed to handle massive knowledge bases efficiently.
- No “Smart” Retrieval: A true RAG system uses semantic search to find the most relevant snippets of text to answer a question. Our solution sends the entire knowledge base every time. While this works well with a large context window (roughly 750,000 words at once.), it can sometimes be less precise than targeted retrieval.
Basic Handoff: The email-based handoff is a simple notification system. It lacks the features of a professional customer support platform with live agent queuing and real-time chat.
How to Add It to Your Website
We’ve now created a great chatbot. While it doesn’t have robust queuing or a real-time human handoff capability, and it isn’t designed for a massive volume of training text, it stands out as a reliable and incredibly cheap solution. For many small and medium-sized businesses, this can be a fantastic way to improve the quality of service for their users without a major investment.
The natural next step is to move this chatbot from a standalone web app to a live, customer-facing tool on your website. In my next tutorial, we will review exactly how to implement it into a real-life site, as that requires a few modifications to the code we just created. Stay tuned!
About the Author
Attila
I am a Senior Data Analyst and Automation Specialist with 15+ years of experience building practical solutions on Google Workspace to supercharge your productivity. Let me transform your raw data into a decisive competitive advantage and automate your workflows, all within the platform your team already knows.